Don't miss our holiday offer - up to 50% OFF!
Silicone Breast Form Size & Fit Guide 2026 – Perfect Fit Every Time
The Importance of Proper Size & Fit for Silicone Breast Forms
Proper size and fit are critical to the functionality, comfort, and realism of silicone breast forms. A poorly fitted silicone breast form can cause discomfort, pressure points, an unnatural silhouette, and reduced confidence. This comprehensive size and fit guide provides a systematic approach to measuring, selecting, and adjusting silicone breast forms, ensuring users achieve a perfect fit that aligns with their body type and desired silhouette. The guide is applicable to all types of silicone breast forms, including adhesive and pocket bra-compatible models, and includes step-by-step measurement instructions, size chart interpretation, and fit adjustment tips.
Many users make the mistake of selecting a silicone breast form based solely on cup size, without considering their chest circumference, body shape, or desired enhancement. This often leads to an improper fit, as cup size alone does not account for the unique contours of the user’s chest. This guide addresses this issue, providing a holistic approach to size and fit that ensures the silicone breast form integrates seamlessly with the user’s body.
Step 1: How to Measure for a Silicone Breast Form
Accurate measurement is the foundation of a proper fit. Users will need a soft, flexible measuring tape and a mirror (optional) to ensure precision. The measurement process involves two key steps: measuring the chest circumference and determining the desired cup size. For post-mastectomy users, measurements should be taken around the chest wall, just below the armpits, ensuring the measuring tape is snug but not tight. For users seeking enhancement, measurements should be taken around the fullest part of the bust (if applicable) and the chest wall, to determine the difference between the two—this difference corresponds to the cup size.
Detailed measurement steps: 1. Stand upright with shoulders relaxed and arms at your sides. 2. Wrap the measuring tape around your chest wall, just below the armpits, ensuring it is level and snug (not tight). Record this measurement as your chest circumference. 3. If measuring for enhancement, wrap the tape around the fullest part of your bust, ensuring it is level and snug. Record this measurement. 4. Subtract your chest circumference from your bust measurement—each inch of difference corresponds to a cup size (e.g., 1 inch = A cup, 2 inches = B cup, etc.). 5. Use these measurements to consult the brand’s size chart, which will recommend the appropriate silicone breast form size.
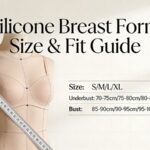
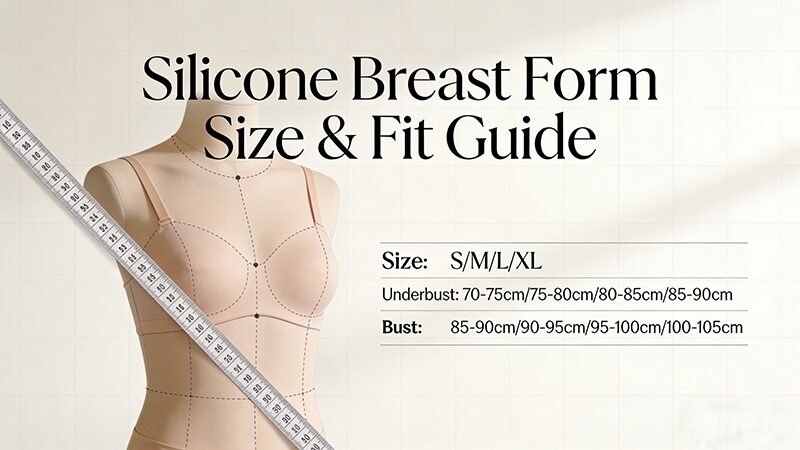
Step 2: Interpreting Silicone Breast Form Size Charts
Most silicone breast form brands provide size charts that correlate chest circumference and cup size to the appropriate breast form size. It is important to note that size charts may vary between brands, so users should always consult the specific brand’s chart rather than relying on a universal size. Size charts typically include columns for chest circumference, cup size, and the corresponding breast form size (e.g., Size 3, Size 4). Some brands also provide additional measurements, such as the width and height of the breast form, to help users select the best fit for their body shape.
When interpreting size charts, users should prioritize chest circumference first, as this determines the base size of the breast form. The cup size then determines the volume of the breast form, ensuring it provides the desired enhancement. If a user’s measurements fall between two sizes, it is recommended to select the larger size, as it can be adjusted for a better fit, while a smaller size may be too tight and uncomfortable.
Step 3: Fit Adjustments for Silicone Breast Forms
Even with accurate measurements, minor fit adjustments may be necessary to achieve optimal comfort and realism. For pocket bra-compatible silicone breast forms, adjusting the bra straps can help position the breast form correctly—straps should be tightened or loosened to ensure the breast form sits evenly on the chest, with no gaps or pressure points. For adhesive silicone breast forms, adjusting the position during application can help achieve a natural fit—aligning the breast form with the user’s natural breast crease (if applicable) ensures a seamless appearance.
If the silicone breast form feels too loose or shifts during movement, additional adjustments may be needed. For pocket bra models, using a bra with a tighter band or adding padding to the bra’s pockets can help secure the breast form. For adhesive models, ensuring the skin is clean and dry before application, or using additional adhesive strips, can enhance security. If the breast form feels too tight or causes soreness, it may be necessary to size up.
Common Size & Fit Mistakes to Avoid
Users often make avoidable size and fit mistakes that compromise comfort and realism. One common mistake is selecting a cup size that is too large, leading to an unnatural silhouette and discomfort. Another mistake is neglecting to measure chest circumference, resulting in a breast form that is too tight or too loose. Additionally, users may fail to adjust the breast form or bra properly, leading to shifting and an unrealistic appearance. By following the measurement and adjustment steps outlined in this guide, users can avoid these mistakes and achieve a perfect fit.
Final Tips for Perfect Silicone Breast Form Fit
Achieving a perfect fit with silicone breast forms requires accurate measurement, careful size chart interpretation, and minor adjustments. Users should measure themselves regularly, as weight changes or body fluctuations can affect fit. Additionally, trying on the silicone breast form with the clothing they plan to wear can help ensure a seamless appearance. If unsure about the size, many brands offer size guides or customer support to assist with selection. By prioritizing proper size and fit, users can enhance the comfort, realism, and functionality of their silicone breast forms, ensuring a positive experience with the device.